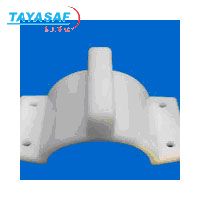
Features
All non-metallic. No nuts, bolts, washers or any other metal parts to corrode or degrade over time.
Designed for carrier pipe diameters from 0.83 (21 mm) to 37.60" (955mm) in diameter.
Segmented pieces - small inventory may be used to accommodate a large variety of pipe styles, types and diameters. No extra trips from job site to warehouse for additional parts.
Easy assembly. Simply slide the segments together and ratchet tight with the patented Slide-Lock connecting system.
Wide variety of runner heights to allow numerous options for pipe positioning within the casing.
Runner variations may be used to adjust for grade.
Manufactured from UV resistant polymer.
High impact strength, 1.5 ft. Ibs./square inch (10.34kPa)
Excellent compressive strength, 3, 000 Ibs./square inch (211 kg/square cm)
Wide temperature range, -40° to + 180° F. (-40° to +90° C.)
Eliminates sand or grout fill.
No special tools required for installation.
Low coefficient of friction for ease of installation.
Will accommodate small conduit attachment for communications or electrical cable.
Illustrated above: Based on 20' (6.1 M) carrier pipe segments in a casing of not more than 300' (91.5 m). Consult Corrosion Control Products Company for longer casings and for concrete pipe. Use 2 spacers/length of pipe for 13' (4.0 m) sewer pipe segments.
Installation
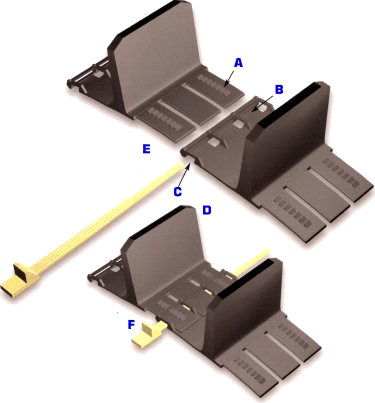
Component Parts - Installation
Separate segments are connected by inserting the buckles into slots on the adjacent segment.
A. Buckles with angled ratchet nubs.
B. Slots accept buckles and hold segment in position around pipe in preparation for final tightening.
C. Slot accepts Slide-Lock. Arrow molded on segment indicates correct insertion direction.
D. Runners are available in a variety of heights to allow for desired carrier pipe placement in casing.
E. Slide-Lock is used to tension the segments together after installation on pipe. Channels face up during insertion while the correct size slide-lock (micro, mini, midi, maxi) is molded on the flat (bottom) side.
F. Slide-Lock is inserted into channel to close and lock the segments together. Slide-Lock removal and re-insertion will ratchet the segments together for final tightening against carrier pipe.
Installation Tips
As with any installation process, it is important to wear appropriate eye and personal protection. This is even more important if installation work must be done at low temperatures.
It can be beneficial to place the Ranger II segments and Slide-Locks in a warm environment while awaiting installation in colder climates.
During the installation process, no matter what the temperature, it is essential that the Slide-Locks be supported by the carrier pipe to eliminate the possibility of bending the Slide-Locks during insertion.
Under hot installation conditions, it is better to allow the product to age a couple of hours at ambient temperature prior to assembly.
Illustrated Installation Procedure
|
|
|
|
|
1. Size the Ranger II to make sure you have all the segments and Slide Locks. |
2. Take the segments and align the buckles. Insert the buckles 1/4 of the way in to the slots. |
3. Locate directional arrow on segment and insert Slide Lock until it tips out the end of the segment. |
|
|
|
|
|
4. Continue the process from the previous steps until all segments are put together. You are now ready to wrap the Ranger II around the pipe. |
5. Align the buckles into place. Take the final Slide Lock and slide completely into place. |
6. Insert all Slide Locks as far as possible by hand. Complete tightening by lightly tapping each Slide Lock with a light rubber headed hammer. |
|
|
|
|
|
7a. To tighten Ranger II secure to carrier pipe, back Slide Lock completely out of slot. If needed, push segments together by hand. |
7b. Reinsert Slide Locks completely into segment by lightly tapping Slide Lock back into position. |
8. Continue steps 7a and 7b until Ranger II is secure against |

 泰亚赛福 —— 世界领先的检测仪器集成供应商


 您当前的位置:


 加入对比
加入对比


